Device Firmware
Firmware updates for BuildAX devices will be provided as a .hex file. This document describes the process of flashing the devices with updated firmware.
Warning: Updating the firmware is a potentially risky process. If you flash a device with an incorrect firmware file (or use a third-party bootloader application which has a bug) you could render it permanently unusable!
Downloads
Tested bootloader software for the BAX devices is provided for Windows OSes in the OpenMovement repository, along with the firmware for each device.
Download BuildAX Firmware here. Ensure you download the correct firmware for your device.
BuildAX LRS
Web Interface Upgrades: The web interface data files do not also need to be upgraded when a firmware upgrade is applied, but this is recommended in order to access new and improved functionality. See here for more information.
Put the LRS into bootloader mode
Remove the USB power connector from the LRS. Hold down the button on the rear of the device and connect the USB cable between the PC and the LRS. The LRS should enter bootloader mode, indicated by the LEDs counting up from 1-7 continuously.
Connecting to the PC
Open the firmware flashing tool provided in the OpenMovement repository. Tools for other platforms may be available online.
Enable the USB checkbox. The Vendor ID should be 0x4D8, and the Product ID
0x03C. Now hit the "Connect" button. The tool should show that it has
connected to the device.
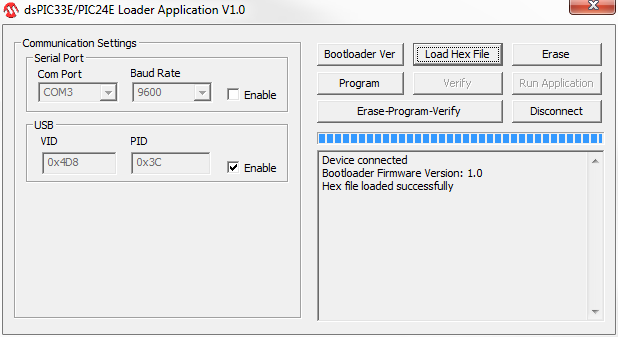
Next, click "Load Hex File" and select the new firmware. Double check that you have selected the correct firmware file for the LRS. Then, click "Erase-Program-Verify", and the new firmware will be written to the device.
When this is completed, "Run Application" will cause the LRS to exit bootloader mode. If using a USB wall power adaptor, it is now safe to remove the device from the PC and re-connect it to its own adapter.
Reset ALL Settings (re-generate MAC address)
To permanently reset all settings, including assigning a new random MAC address, hold the button on the rear of the LRS and click "Run Application" at this stage. Note that this may result in the LRS not being able to access the network if you have used the device's old MAC address to assign it an IP.
Video
BuildAX ENV Sensor
Writing a firmware .hex file onto a BuildAX ENV sensor requires a PIC18f
bootloader application. A Windows executable will be provided in the
OpenMovement repository for this purpose (AN1310ui.exe).
FTDI cable: To connect to a BuildAX sensor, a suitable FTDI cable is required. Please refer to the Connection Guide for details of the cable and driver installation.
Put the ENV into bootloader mode
- Insert batteries into the ENV sensor
- Push the FTDI cable onto the 3-pin header on the device, with the orange wire facing the corner of the device (the USB end should be connected to your PC).
- Push the button next to the programming header while the green LED on the sensor is lit.
The LED will flash red/green briefly before lighting solid red. This indicates that the sensor is now in bootloader mode.
Writing new firmware
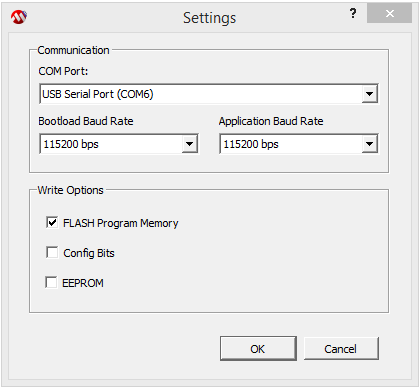
Now you should connect the PC bootloader application to the sensor. You will need to set the correct serial port and baud rate in the settings dialog (program -> settings).
In the AN1310 PIC18f bootloader, click the red "stop" button in the toolbar. Then, load the new firmware into the application using the "open" menu. The application should now look similar to this:
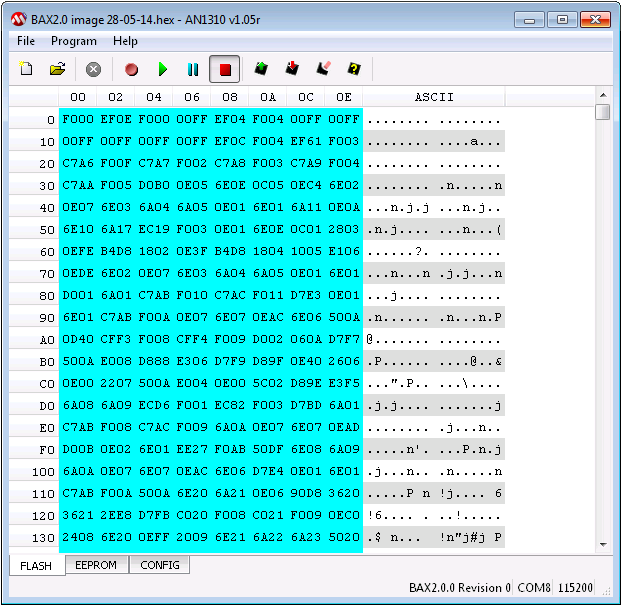
Hit the "Write Device" button on the toolbar (rectangle with red arrow) to program the device with the new firmware. When completed, the status bar should show "Write complete (Flash 11.897s)" or similar time. Finally, hit the "Run Application Firmware" button (the green "play" arrow) to exit bootloader mode.